

![]()
![]()
![]()
![]()
![]()
![]()
![]()
![]()
We are an established independant video games retailer located in Pembury Village, Kent
100" Big Screen TV Projector
Materials
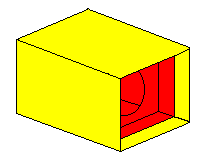
Overview The projector consists of two boxes, an outer box (shown in yellow in the picture), and an inner focusing box which holds the lens (shown in red). The inner box fits snugly inside the outer one, and can be moved in and out to focus the image.
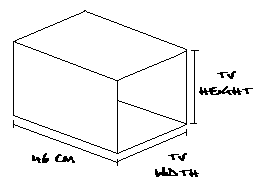
Step 1 First we need to make the outer box. Cut out four pieces of card, two of which are 46cm x the height of your TV screen, and two which are 46cm x the width of your TV screen.
Now paint one side of each piece of cardboard with the matt black paint. When the paint is dry, assemble the four pieces into a box shape with the duct tape. Make sure the black sides are on the inside of the box, and ensure there are no gaps along the edges where light could escape.
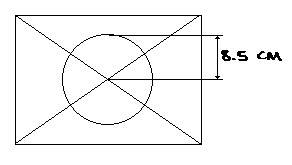
Step 2 The focusing box needs to be slightly smaller than the outer one, so that it can fit inside. Again, cut out four pieces of card, this time two of them should be 23 cm x 0.5 cm less than the height of your TV screen, the other two 23 cm x 0.5 cm less than the width of your TV screen. So if your first box had two pieces of card that were 46 cm x 40 cm, and two that were 46 cm x 30 cm, this time you would need two pieces that are 23 cm x 39.5 cm (40 cm – 0.5 cm), and two that are 23 cm x 29.5 cm (30 cm – 0.5 cm). Finally you need to make the board that will hold the lens. Cut out a piece of cardboard that is 1 cm smaller each side than the size of your TV screen. If your TV screen is 40cm x 30 cm you need to make this piece 39cm x 29cm.
Now draw two straight lines from the corners of the board to find the centre and draw a circle with a radius of 8.5 cm. Cut out and discard the circle. You should now paint one side of each of the five pieces of cardboard with the matt black paint and wait for it to dry. Now tape the lens to the back of the board with the hole in it (the black side) making sure that it is central. The hole should match up exactly with one of the circles on the lens. You can now assemble the box. Tape the four side pieces together in the same way as you did the first box, making sure that the black sides are on the inside of the box. Next place the lens board inside the box, about 3cm from the end and tape it into place. Make sure the lens board is completely vertical, not at an angle, and that the black side is facing inwards. You must ensure that there are no gaps around the edges of the pieces of card that could let light escape. You should now have two boxes both completely black on the inside. Just slide the smaller box into the larger one and your projector is complete (and should look something like the picture on the first page).
Step 3 To use your projector, turn your television upside-down and tape the box to the edges of the screen making sure that there are no gaps. This will not harm your TV. If the colours look inverted when your TV is the wrong way up, leave it turned off for ten minutes and then turn it back on, the colours will have corrected themselves. Find a suitable distance for your projector to be from your wall or screen and move the inner box in or out to focus the image. It may take some time to find the best position and focus adjustment, have patience and don’t be afraid to experiment with different distances. You will find that your projector works best if you turn up the brightness level on your TV to it’s highest. You need to use the projector in a completely dark room. A silver projection screen with a black border will give the best results, but a light coloured wall will also work. The image you see will be reversed, if this is a problem turn the projector sideways and place a mirror at 45 degrees straight in front of it. This will correct the image. |
*If you pass them off as your own work, I will find out!*

*This website layout, web graphics, and html code are copyright of Play N' Trade 2002*